Wednesday, October 24, 2012

Top free Android applications for making Video calls

Android market is started booming because of its wide range of android smart phones released by Top mobile making companies. It contains over millions of applications (known as apps) which can be downloaded into the android devices.

About Video Calling:  It is similar to tele conference of conventional system. We can make video calls between android devices if both have front camera to capture the video of caller.

There are some apps that allow us to make video/audio calls including the messaging services.It is best alternative to phone calls over the mobile phones, which incurs high tariff rates. Here we can make free calls between the android phones being the same app is installed in both of the devices and with limited cost for making other calls.

Some of the best from those apps are being mentioned below covering the features they provide.

1.   Tango:
  • This free app allows you to make video calls over Wi-Fi or 3G networks.
  • It also lets you allow to send FREE Text Messages and send FREE Video Messages.
  • The app is rated very good (4.3 out of 5) in the Google play and is simple to use.  
  • Once installed, it automatically searches your address book and lets you know which friends use this service.
  • Can be downloaded from here.


2.   Viber: 
  • Viber is Free to to make video calls over Wi-Fi or 3G networks.
  • It lets everyone in the world connect through over 90 million Viber users call, text, and send photos worldwide for free.
  • Rated good in Google play with 4.3 out of 5.
  • Viber is completely free with no advertising.
  • It has best sound quality even in poor signal strength and you can send free messages to groups of friends, share photos and links.
  • Can be downloaded from here.


3.   Skype:  
  • Works on 3G and Wi-fi networks.
  • Widely known for its popularity and been available in iOS too.
  • It not only allows free audio, video calls, SMS and sending videos and files, but text messaging and regular phone calls too at low cost.
  • Rated good in Google play with 4 out of 5.
  • Can be downloaded from here.


WATCH OUT:  For using all the above apps, operator data charges may apply. And recommended to use an unlimited data plan or WiFi connection.


Monday, October 22, 2012

How to back up Outlook items by creating pst files

Outlook is an personal independent messenger, where you can view and send mails. The best option here is that it can still works offline. That means, unlike other email hosting sites (where you can view the mails only through internet access), you can view the synched mails when your internet is offline.

What is a pst file in outlook? - Microsoft's Outlook also provides a good feature of backing up the mails through which you can backup the old data of mails or calendar events you have sent or received. It can be done by creating a Personal Storage Table, which is nothing but another folder where the back up files are to be resided. And it is pouplarly known as .pst file.

The following is the procedure for the same.

For Outlook 2010
  • Open the outlook and click on New Items button. 
  • From the list it shows, click on More Items and then Select Outlook Data file.. option.


  • Now it will pop up the Browse file option to select the back up file location and enter the name of the Backup file.
  • Here you can choose the compatability of the pst file through Save as type dropdown, where Outlook 97-2002 Data file option is for outlook versions between 1997 to 2002. The other option is for the higher versions.
  • Click on Ok. And it will open up a window prompting for password option, if you want to set the password for the backup file. It is not mandate to give the password, you can click on Ok.
  • It will add the backup file location to add the left panel of the outlook where you can directly drag and drop the emails to this folder.
Note: For outlook versions 2003 and 2007, the backup option can be availed by clicking on File menu and selecting the New button followed by the Outlook Data File as marked in the below figure.


Saturday, October 20, 2012

Preview Pane in Gmail

The Google is now providing the Preview Pane option for the email. It is similar to that of Outlook. It eases your readability and also improves the navigation through the emails.

There are simple steps to enable the preview pane, as followed below.
  • Click on the Settings link in the top right corner of the page.
  • Now click on the Labs link.
  • Type Pane in the search box provided.
  • Select the radio button next to Preview Pane text.


  • Click on the Save Changes button. It will reload the page.
  • Now, in the email list page you can find the link, which will provide the options of Vertical Pane and Horizontal Pane.


  • Choose your own options of the preview pane based on your compatibility. And check which option displays the email in the most readable format by selecting either of Preview options.
  • Select any of the preview option and click on the mail to be shown as preview. The vertical and horizontal previews look like the below figures.


  • At any time this preview can be disabled through No Split link available in the mail list page.

Also see, How to delegate your gmail account
               Know android buddies from your contact list

Friday, October 19, 2012

Know your Android buddies in Gmail

Now a days android devices became very popular because of their exiting features, games and various applications (known as apps). For each android device, before you start on using it, you must configure it with your gmail credentials. It is must to download any apps from Android market widely known as Google Play.

You can get to know whom of your friends are logged in to gmail or GTalk through the Anroid device. Steps are detailed below.
  • Click on the Settings link present in the top right side of the gmail home page.
  • Select Labs link from the options available.
  • Type Green  in the Textbox next to the Label Enter Search For a lab.
  • Enable the radio button next to Green Robot.


  • Click on the Save Changes button present below the above section.
  • Now it will show the Android Robo symbol in the status as rounded in the figure above.

Wednesday, October 17, 2012

how to delete Facebook account permanently?

Facebook is also one of the most popular Social Networking website. It provides many features like connecting to friends, sharing the photos, chat options & so on. But once you fed up with it and do not want to be continued, the account can be deleted / deactivated. It can be done in the following two ways.
  1. Make Your account deactivated. (Deactivate facebook account)
  2. Permanently deleting the account.
 Permanently deleting Facebook Account:

Unlike the Deactivation, this will delete your profile and all data related to you permanently from the facebook.

It can be done by following the below procedure.
  • Log in to Facebook and open the Deletion page by clicking the below link.
https://www.facebook.com/help/contact.php?show_form=delete_account


  • Now delete account page will appear. Click on Delete my account button.
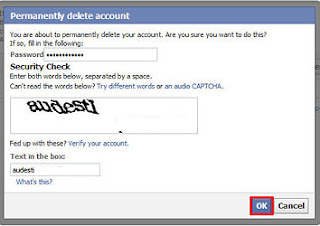
  • A new pop up window will appear asking to re-renter the password.


  • Enter the text Captcha text displayed in the screen. Click on Ok button.
  • Now you account is permanently deleted.
WATCH OUT:  If you want to roll back your deleted account, just log in back within 14 days of this procedure, which will re-activate the account.

You can also delete your account permanently by directly contacting facebook team at privacy@facebook.com.

Tuesday, October 16, 2012

how to deactivate facebook account?

We all use  social networking sites to express what's happening in our life and what our friends are up to. However, we sometimes think that we got struck in the spider web of social networking or might feel like its killing our personal and valuable time. Then we will decide to move out of the sites by completely removing your profile.

Facebook is also one of the most popular Social Networking website. It provides many features like connecting to friends, sharing the photos, chat options & so on..  But once you fed up with it, you can remove profile in two ways.
  1. Make Your account deactivated.
  2. Permanently deleting the account (Deleting Facebook Account permanently).
Making the Account Deactivated:

It allows you to hide all your Facebook information as if you had quit facebook, but still you will be able to turn your account reactivate back keeping all your contacts and messages restored.

It can be done by following the below steps.
  • Log in to Facebook.
  • Click on Account Settings present on the upper right corner on the page beside Home button.
  • Select the Security Option on the left panel of the page.
  • Deactivate Your Account link will be present as the last option in the page. Click on the link.


  • It will open a new page, where you need to fill the reason for deactivating the account as marked in the next figure. And give the details explanation for the same( this is not mandatory).
  • Check check box next to Email Opt out text, if you DO NOT want receive any emails from Facebook. If you UnCheck this, your friends can still invite you to events, tag you in photos or ask you to join group.
  • Click on the Confirm button in the page. Now you are deactivated from your account.

IMPORTANT WATCH OUT:
  • Though you deactivated your account, the third party applications can still able to activate your information. That means, they will retain the information of you. The only way to permanently remove the account is by permanently deleting your account.
  • Though you deactivate, your posts on friends' walls remain. However, your name appears as unclickable text. Photos, status updates and other information related to your page are taken down and your user account is taken off Community pages.
  • After deactivating,if you log in to the facebook at any time, you account will be re-activated and thus you will become an Active User.

Monday, October 15, 2012

Point Your Google Search to Country Specific


We all use google search engine for searching the queries. Often, we will just open up the Google website and enter our query, which end up with showing the result page(s).

We can restrict the google to search only in the country specific pages (For eg., the locale is www.google.co.in for INDIA). And if we want to make this option default for each time we open the google website, there is small and easy procedure to follow.

  • First open the browser and open the Google website. Go to footer of the page (bottom left corner).


  • Select the other domain extension available, as marked in red in above figure. Now the page will reload and open www.google.co.in , as option available here is the same.
  • To make sure it is set as default, open a new window and type google.com in the address bar and press Enter key. Now, it will redirect to the default web page as configured in the above steps.

Saturday, October 13, 2012

how to change password in gmail

Many of us are using the google's mail servie GMAIL for our day-to-day mails purpose. One must regularly change the gmail password in order to prevent accessing it by unauthenticated parties.

There is 3 step simple procedure to make your gmail secure.

  • Login to your gmail account and go to the top right corner of the page, where it shows your information. Click on the Account link marked in red below.


  • It will open a new page. Click on the Security on the left panel of page.Now, the Change Password button will appear in the page displayed.


  • Change the password by entering the old password OR answering security question (in case of forgotten password). And now enter the new password twice in the boxes provided and click on Save button.

NOTE: For effectively managing the password non-vulnerable, make sure your password contains the combination of Alphanumeric words (Alphabet and numbers) and Alphabet should contain a mix of "UPPER CASE" and "lower case" letters.

Free SMS by Google is now launched in INDIA

Google launched its free text messaging service in India on this Oct 10, 2012. To send the free messages on line, one can open the gmail chat or GTalk. There we can find the "Send Text" option for the particular chat friend as shown below.


Note:  If you are using Gmail chat and Send SMS link is not showing for any contact, make sure that you are enabled the feature in Gmail.

Go set this option:
  • Open the Settings option from Gmail page.
  • Click on Labs link. And Enable radio button next to SMS in Chat option as shown in below figure.


Once you click on the option, it will show up the pop-up window. Here you need to select the country as India (it will be default for Indians) and the phone number of the Chat friend.

Now it will show up the Text Message window (similar to below figure), where you can write the message and send to your contact for free.


WATCH OUT: You can send only 50 messages for free per day. But if the receiver of the SMS replies back to the message to you, 5 more messages will be credited to your account. Otherwise the count will be restored back to 50 ONLY after 24 HOURS. That means again you can send more messages for free.

This service is now available for all the Mobile Operators. So friends, start making use of this free SMS service by Google and Have Fun.!!

Sunday, October 07, 2012

how to make laptop a WiFi hotspot?

What is WiFi hotspot:  A hotspot is any machine that offers Internet access over a wireless LAN through the use of a router connected to a link to an Internet service provider. Hotspots typically use Wi-Fi technology for the wireless network. {See: Definition from Google}

Many of us have laptops with the internet connection Ethernet/Wireless, which needs to be shared with the friends/colleagues. If they have WiFi enabled devices (any smart phones, laptops or Tablets), it is not a big deal to turn our laptop into a mobile Wifi hotspot without any need of Wifi router.

How to Cinfigure in Windows XP?

  • Click on Start button, select Control Panel.
  • Double click on Network Connections option.
  • Right click on the Wireless Network Connection and choose Properties from the list.
  • Choose Wireless Networks tab.
  • Check Use Windows to configure my wireless network settings checkbox.


  • Click on Add button.
  • Enter the Network Name (SSID) of your own WiFi name.


  • Choose Network Authentication option to "Shared". And click on OK.
  • We can secure the Wifi by providing the Network Key. It is a password which needs to be entered when anyone is going to connect to this network.
  • Now it will display the newly added Wifi in the list.
  • Select the Wifi name and click on the Advanced button.
  • Select Computer-to-computer (ad hoc) networks only radio button and click on the Close button.
Now the laptop is ready to share the Wifi with the other devices. Now we have to tell the Windows, from which internet connection it needs to share the internet. Here we are sharing the connection from Ethernet.

  • Go to Local Area Connections, right click it and select properties.
  • Go to the Advanced tab.
  • Under Internet Connection Sharing section select the box “Allow other network users to connect through this computer’s internet connection”.
  • Make sure the box under that option is NOT selected so that no one can disable the network remotely.
  • Click on Ok.
Now the set up is ready. The friends/colleages around you are now able to connect to the newly added Wifi. You can enjoy the unlimited internet by sharing the single internet connection. It best works when you have a very good speed.


Please feel free to drop your comments if the post really helps you.

Saturday, October 06, 2012

How to Effectively manage "Subscribers" feature in Facebook?

What Does Subscriber mean? We can able to see the public updates of any person who is on the facebbook, without adding him/her as your friend. It is one of the good feature provided by Facebook.

How to enable it? We can also enable the feature by going to top corner section in the facebook page and clicking on the "Account Settings" option. Now it will open the window with mutliple options in the left panel of the web page.  There we can find the option as highlighted in the figure.


Check the box next to "Allow Subscribers" option  to enable this feature. Form now on, it will show you "Subscribe" button on your facebook timeline page by clicking on which the others can start following you by seeing your public updates. We can still allow the followers to comment on the public updates we made by editing the options provided on the above page.

Watching the Preview: We can see the public profile page of our facebook page by clicking on the link highlighted in Red in the above figure. There it will show the "Subscribe" button with your public profile updates on the page.

Caution: If you already allow subscribers, anyone sends friend requests that are ignored, deleted or hidden or unfriend by you, that person will become your subscribers. If you don’t want a specific person to subscribe to your public updates, or want to disconnect from a specific subscriber, you can block them at any time.

Tuesday, October 02, 2012

Benchmarking for an Android phone

Many of us are using the android devices. We might be thinking of measuring our own android phone performance with that of others. There are plenty of apps available for checking the same.  AnTuTu Benchmarking is one among them.


This app is superior to rest of the apps when comes to calculation of the performance (under various categories like "2G Graphics", "CPU frequency", "RAM speed") and easy of User Interface in showing the results. It displays the category wise score of the device along with the overall score. We can even compare the ranking of our device by submitting the score online.


We can download the app for Free from the link: https://play.google.com/store/apps/details?id=com.antutu.ABenchMark&feature=search_result#?t=W10.

Monday, October 01, 2012

DELEGATE your Gmail account


Many of us might be having multiple gmail accounts for different purposes. It will be difficult to work by opening all the gmail accounts and also we are unable to log in to more than one gmail account at the same time (unless you open a new Session). And moreover, we have to remember all those passwords.

So, to work with all the gmail accounts you have, by delegating all your existing accounts with your primary mail, you can ease the effort. This is provided by Google's "Add Account" feature. Here we can add  any number of accounts associated with you.

The following are the steps to delegate new account(s).

  • To add a new account, first log in to your any existing gmail. This is the one from which you will able to open all your gmail accounts.
  • Go to the top right corner where your details are displayed, click on your name link provided. Now it will open  up a pop-up window by showing your account details {See below}.


  • Now click on  "Add Account" button on the above pop up.
  • It will open up a new gmail log in window.
  • Now give your gmail user name and password for the account which you want to add as delegated account and click submit.
  • It will open the new gmail window where you can access all your emails.
  • We can add any number of new delegated accounts by following the above steps.
But once you sign-out from any of the account, it will sign you off from all the opened delegated accounts. And at any time you can go to any gmail by going top corner of the page, where it will display all the added gmail accounts.

The best advantage on doing this is, you need not remember all the passwords for the accounts. Of course, you should remember the same of your primary mail account. Even we can leverage the feature by creating a dummy secondary account, which you don't use for mailing, instead when your gmail is running out of free space.

Please write your comments, if my post clarifies your query/queries.

My first ever Blog..

Being thinking of writing something, I decided to blog my experiences. Its been more than 1month to decide the topic to write, have taken many suggestions from the friend who is successfully running a blog and also googled with many key words to start with my blogging.

I narrowed down by filtering all the available options and finally stick to write on the technical things which we face in our day-to-day routine. I am also trying to write the technical and useful topics which very useful. Be here to have crunchy yet useful techincal bites for pointing the solutions to your problems. 

Wish me ALL THE VERY BEST for my bloggings and please drop me your valuable suggestions.